JavaScript: Updating DOM during a long-running computation
When running a lengthy computation, it's considered good practice to provide an indication of progress to the user. This can be surprisingly difficult in client-side JavaScript, even with modern ECMAScript features like Promises and async/await. The difficulty arises with continuously-running computations. Such computations block the event loop and typically prevent the browser from updating the DOM. Which means, any progress indicators updated in the DOM will not be visible until the computation has completed. And that kind of defeats the purpose of progress indicators.
One way to solve this problem is to move computationally-intensive code into a web worker, which will run in the background and not block the event loop. And that's a good way to do it most of the time. However, web workers do have some limitations. Transferring large amounts of data from a web worker to the main thread is not straightforward, and might require copying it, effectively doubling the memory usage of a large data set. For example, I found myself facing this issue when processing a large time-series data set that needed to be passed to a visualization library in the main thread.
So here's another way to do it. The approach is a helper function, which I'll call doUntil, which handles periodically yielding execution to allow the DOM to update. So rather than using, say, a for loop to iterate over the data, the body of that loop is encapsulated in a function and passed to the helper function. In addition to the loop body, the helper function takes two additional boolean-valued functions: one that returns true when it is time to temporarily yield execution, and one that returns true when the computation has completed. Here's an example that uses doUntil to calculate the primes between 2 and 1000000 (full code).
function findPrimesNonBlocking() {

    // Initialize loop variable and list of primes
    let n = 2;
    let primes = [];

    // Yield every 1000 iterations and stop after 1000000
    const stopCondition = () => n == 1000000;
    const yieldCondition = () => n % 10000 == 0;

    // Build the loop body to be passed to doUntil()
    const loop = () => {

	// Determine if n is prime
	if (isPrime(n, primes)) {
	    primes.push(n);
	}

	// Increment n
	n += 1;

	// Update DOM if we're about to yield
	if (yieldCondition()) {
	    document.body.textContent =
		`Found ${primes.length} primes between 2 and ${n}`;
	}
    };

    // Execute
    doUntil(loop, stopCondition, yieldCondition);
}
In the above code, the loop function encapsulates a single iteration of the computation, namely testing a single number for primality. The yieldCondition function returns true every 10000 iterations, providing feedback frequently, but not so frequently that repeated DOM updates slow the browser. The stopCondition function stops execution after the loop variable n reaches 1000000. In this case, the code indicates status by reporting the number of primes found so far, but the entire array primes is available to the main thread at all times, without the need to copy it. It's also worth noting that doUntil returns a Promise, so it can be wrapped in async/await if desired, or a then clause can be added.
Here's the code for doUntil. It creates an outerLoop function that repeatedly calls the provided loop function, checking for yield and stop conditions between each iteration. When it is time to yield, setTimeout is used to queue up the next iteration in the event loop, providing a chance for the DOM to update. Because loop and even outerLoop are called multiple times throughout the computation, the computation state (in this case n and primes) has to be stored elsewhere, namely in the scope of the calling function (findPrimesNonBlocking in the example). The loop function is also defined in the scope of the calling function, giving it access to the state variables.
function doUntil(loop, stopCondition, yieldCondition) {

    // Wrap function in promise so it can run asynchronously
    return new Promise((resolve, reject) => {

	// Build outerLoop function to pass to setTimeout
	let outerLoop = function () {
	    while (true) {

		// Execute a single inner loop iteration
		loop();

		if (stopCondition()) {
		    // Resolve promise, exit outer loop,
                    // and do not re-enter
		    resolve();
		    break;
		} else if (yieldCondition()) {
		    // Exit outer loop and queue up next
                    // outer loop iteration for next event loop cycle
		    setTimeout(outerLoop, 0);
		    break;
		}

		// Continue to next inner loop iteration
                // without yielding
	    }
	};

	// Start the first iteration of outer loop,
        // unless the stop condition is met
	if (!stopCondition()) {
	    setTimeout(outerLoop, 0);
	}
    });
}
So if you've got a lengthy computation in the main JavaScript thread and you want to update a progress indicator in the DOM, this is one way to do it.
ResourceListener: many endpoints, many requests
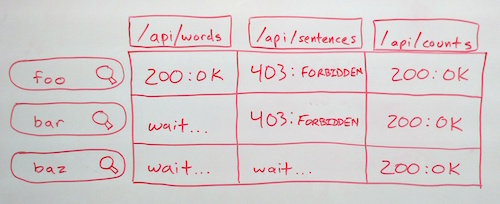
While building the new MediaMeter Dashboard tool, the team at the MIT Center for Civic Media faced an interesting design challenge: keeping track of multiple requests to each of multiple API endpoints and rendering views when the right data is ready. For more context, we designed the Dashboard as a front end for the Media Cloud API from Harvard's Berkman Center. We wanted users to be able to enter several searches and compare the results in many different ways (e.g. result count over time, word frequency, text snippets). What's more, we wanted the tool to be extensible, so it was easy to add new visualizations or accommodate new API endpoints. So we're creating a request for every search/endpoint combination, and each visualization could potentially depend on any combination of them. To make all these requests manageable, I augmented backbone.js's built-in events with a ResourceListener class.
ResourceListener is based on the EventAggregator pattern. A single object aggregates all events related to API requests. All of the different visualizations can then listen to that object for resource-related events, rather than listening to specific models and collections directly. To use the ResourceListener, you need to add a "resourceType" attribute when defining models or collections. Then, after creating the models, simply pass them to the ResourceListener's listen() method. Every time a request is made, the ResourceListener will fire a "request" event and pass the model or collection as a parameter. When the request completes, the ResourceListener will fire a "sync" event, again passing the model as an object. If your only interested in responses from a particular endpoint, you can instead listen to "sync:type" events, where "type" is the "resourceType" attribute of the model or collection. The ResourceListener also fires "resource:complete:type" events when all resources of a particular type are complete, and a "resource:allComplete" when all resources of all types have finished. By passing the ResourceListener object to your views, you can then listen for exactly the events you need, and render as soon as they're complete, without waiting for other requests.
ViewManager: Persistent Views in Single-Page Web Apps

JavaScript frameworks like backbone.js make it easy to create web app content based on the path using Router and View objects. But what if you want some views, and their state, to persist across certain routes? That can be tricky, so I created a simple ViewManager class to take care of the hard parts.
For a concrete example, consider an application that shows a search form (SearchView) and displays the results (ResultView) when it's submitted. You might want to keep displaying the search form along with the results, in case the user wants to modify their search (this is exactly the case that inspired ViewManager while I was working on MediaMeter Dashboard). Following best practices for single-page apps, you put the search results under a different path from the blank search form to allow links directly to the results. But now it gets complicated. If the user gets to the results from the search page, the SearchView already exists, but if the user is coming from a link, the SearchView needs to be created. Same route, different behavior based on the previous route. One approach would be to remove and destroy all views and create them anew every time the route changes. But on top of potentially hindering performance, creating a new view every time destroys useful View state, for instance: whether components of the view are expanded or collapsed.
ViewManager makes it easy to persist views across routes by providing a factory to create views when needed, and a method to automatically hide/show views (similar to the d3.js general update pattern). The getView() factory method takes a View constructor as an argument and either returns the existing view of that class, or creates a new one. The client code doesn't need to keep track of which views already exist, just always call getView() and you don't have to worry about creating duplicates.
The showViews() function is the other half of ViewManager. This function takes a list of views to display, hides any existing views not in the list, and adds any new views that aren't already displayed. If one of the views is already displayed, it won't be recreated and all of the DOM elements will maintain their state. This functionality is also really helpful if you want to add a fade or slide transition when a view is shown or hidden, but don't want to trigger it on route changes.
Mystic Rose Generator
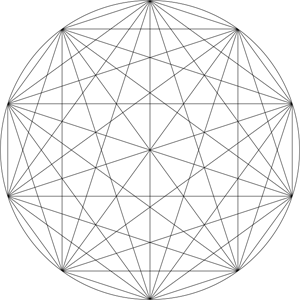
Here's yet another geometric math/art/code thing. It's a javascript-based Mystic Rose Generator. What's a mystic rose? Draw a circle with n evenly spaced points on it and draw a line connecting each point to all the others.
FlakePad

I wanted to do something interactive for Maker Faire last year. I had been drawing my PenFlakes, and thought it would be cool if people could design their own and print them out. So I created FlakePad, a javascript/HTML5 web app that enforces the basic symmetry of a snowflake, and provides a hexagonal grid to work off of.
Aside from being a great way to get my hands dirty with HTML5, the most interesting part of the app was creating the hexagonal grid. I wound up learning about and utilizing Isometric Cubic Coordinates. These coordinates provide an amazingly simple way to label hexagons on a grid, as well as a relatively simple transformation to and from standard Cartesian Coordinates. The basic trick is to recognize that a hexagonal grid, can be seen as a projection of a 3D arrangement of cubes centered on the plane x+y+z=0 (imagine Q*bert, the old NES game).
Copyright © Edward L. Platt 2011–2024
